上一篇中我们介绍了根组件root的初始化渲染过程:

1
2
3
new Vue({
render: h => h(App),
}).$mount('#app')

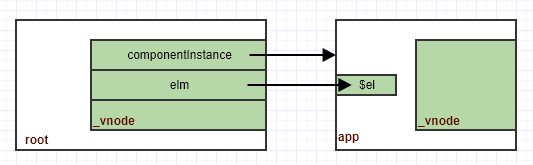
当时我们提到,root的_vnode的componentInstance中存储了App组件的实例(后面称为app):

1
2
3
4
5
const child = vnode.componentInstance = createComponentInstanceForVnode(
vnode,
activeInstance
)
child.$mount(hydrating ? vnode.elm : undefined, hydrating)

在app这个实例mount之后,我们把app.$el插入到页面上整个root就渲染出来了,其中的数据结构如下:

本篇中我们详细看看app的创建及首次渲染过程,我们从createComponentInstanceForVnode开始,在本例中,我们传给你它的2个参数依次为root._vnoderoot

1
2
3
4
5
6
7
8
9
10
11
12
export function createComponentInstanceForVnode (
vnode: any, // we know it's MountedComponentVNode but flow doesn't
parent: any, // activeInstance in lifecycle state
): Component {
const options: InternalComponentOptions = {
_isComponent: true,
_parentVnode: vnode,
parent
}

return new vnode.componentOptions.Ctor(options)
}

App的构造函数是Vue.extend中定义的,最终会调用Vue.prototype._init进行初始化:

1
2
3
4
5
6
7
8
9
10
11
12
13
14
15
16
17
18
19
20
21
22
23
24
25
26
27
28
29
30
31
32
33
34
35
36
37
// src/core/instance/init.js
Vue.prototype._init = function (options?: Object) {
const vm: Component = this
vm._uid = uid++
vm._isVue = true

// merge options
if (options && options._isComponent) {
// optimize internal component instantiation
// since dynamic options merging is pretty slow, and none of the
// internal component options needs special treatment.
initInternalComponent(vm, options)
} else {
vm.$options = mergeOptions(
resolveConstructorOptions(vm.constructor),
options || {},
vm
)
}

vm._renderProxy = vm

// expose real self
vm._self = vm
initLifecycle(vm)
initEvents(vm)
initRender(vm)
callHook(vm, 'beforeCreate')
initInjections(vm) // resolve injections before data/props
initState(vm)
initProvide(vm) // resolve provide after data/props
callHook(vm, 'created')

if (vm.$options.el) {
vm.$mount(vm.$options.el)
}
}

这个初始化方法主要有三个步骤:

  1. 得到vm的最终的$options

    主要是把参数中的options和构造函数的options合并起来作为最终的$options,这里我们options._isComponent是true,所以走的是initInternalComponent,这个细节不讨论,有兴趣大家可以看看参考文档(http://hcysun.me/vue-design/art/)

  2. 做各种初始化

    有兴趣参考(http://hcysun.me/vue-design/art/),这里我们只列出一点:在initLifecycle中我们设置了`vm.$parent`及`vm.$root`:

    1
    2
    3
    4
    5
    6
    7
    8
    9
    10
    11
    12
    13
    // src/core/instance/lifecycle.js
    export function initLifecycle (vm: Component) {
    const options = vm.$options

    let parent = options.parent
    if (parent && !options.abstract) {
    ...
    parent.$children.push(vm)
    }

    vm.$parent = parent
    vm.$root = parent ? parent.$root : vm
    }

    我们这里的options里面是传了parent选项的,这里的值是root

  3. mount

    这里if条件不成立,所以没有mount,mount发生在实例被创建之后

app创建之后,我们马上进行了mount:

1
child.$mount(hydrating ? vnode.elm : undefined, hydrating)

第一个参数是undefined,第二个参数是false。我们知道,mount会重新走_render_update的过程,我们先看看_render,简化如下:

1
2
3
4
5
6
7
8
9
10
11
12
13
14
15
16
17
18
19
20
// src/core/instance/render.js  
Vue.prototype._render = function (): VNode {
const vm: Component = this
const { render, _parentVnode } = vm.$options

/*if (_parentVnode) {
vm.$scopedSlots = _parentVnode.data.scopedSlots || emptyObject
}*/

// set parent vnode. this allows render functions to have access
// to the data on the placeholder node.
vm.$vnode = _parentVnode
// render self
let vnode
vnode = render.call(vm._renderProxy, vm.$createElement)

// set parent
vnode.parent = _parentVnode
return vnode
}

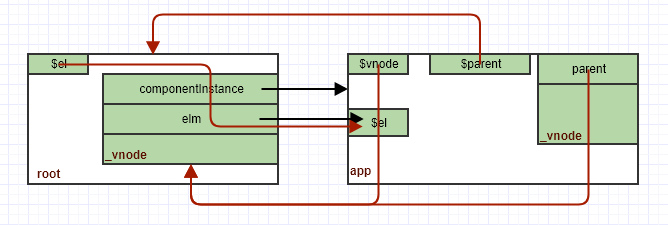
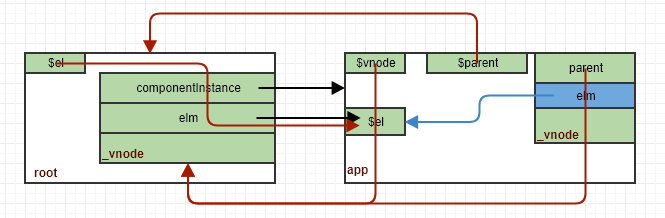
在render之前我们设置了实例的$vnode属性,render之后又设置了vnode.parent属性,_render函数返回的vnode传入_update,我们看看update:

1
2
3
4
5
6
7
8
9
10
11
12
13
14
15
16
17
18
19
20
21
22
23
24
25
26
// src/core/instance/lifecycle.js
Vue.prototype._update = function (vnode: VNode, hydrating?: boolean) {
const vm: Component = this
const prevEl = vm.$el
const prevVnode = vm._vnode
const prevActiveInstance = activeInstance
activeInstance = vm
vm._vnode = vnode

// Vue.prototype.__patch__ is injected in entry points
// based on the rendering backend used.
if (!prevVnode) {
// initial render
vm.$el = vm.__patch__(vm.$el, vnode, hydrating, false /* removeOnly */)
} else {
// updates
}
activeInstance = prevActiveInstance

// if parent is an HOC, update its $el as well
if (vm.$vnode && vm.$parent && vm.$vnode === vm.$parent._vnode) {
vm.$parent.$el = vm.$el
}
// updated hook is called by the scheduler to ensure that children are
// updated in a parent's updated hook.
}

prevElprevVnode分别保存之前的根元素($el)和_vnode,在首次渲染之前,它们都是空的。然后设置新的_vnode,并在patch之后设置新的$el,并且在patch之前修改全局变量activeInstance,设置为自己,这里即app实例,patch完之后再还原成root。最后是一个if语句,在本例中是满足的,所以把root的根元素置为和app的一样,所以经过_render_update时候数据结构变成:

理解了大概的数据结构之后,我们再详细看看app的render和update过程

render

App组件的html模板为:

1
2
3
4
5
6
<template>
<div id="app">
<img alt="Vue logo" src="./assets/logo.png">
<div>hello, world!</div>
</div>
</template>

它生产的render函数如下:

1
2
3
4
5
6
7
8
9
10
11
12
13
14
15
16
17
18
19
20
21
22
23
// webpack:///./src/App.vue?5b21
var render = function() {
var _vm = this
var _h = _vm.$createElement
var _c = _vm._self._c || _h
return _vm._m(0)
}
var staticRenderFns = [
function() {
var _vm = this
var _h = _vm.$createElement
var _c = _vm._self._c || _h
return _c("div", { attrs: { id: "app" } }, [
_c("img", {
attrs: { alt: "Vue logo", src: require("./assets/logo.png") }
}),
_c("div", [_vm._v("hello, world!")])
])
}
]
render._withStripped = true

export { render, staticRenderFns }

我们在_render中是这么调用的:

1
vnode = render.call(vm._renderProxy, vm.$createElement)

vm._renderProxy在生产环境下就是vm,_vm._m其实就是staticRenderFns_c定义如下:

1
vm._c = (a, b, c, d) => createElement(vm, a, b, c, d, false)

最终执行的是下面这段代码:

1
2
3
4
5
6
return _c("div", { attrs: { id: "app" } }, [
_c("img", {
attrs: { alt: "Vue logo", src: require("./assets/logo.png") }
}),
_c("div", [_vm._v("hello, world!")])
])

最终执行的是_createElement

1
2
3
4
5
6
7
8
9
10
// src/core/vdom/create-element.js
export function _createElement (
context: Component,
tag?: string | Class<Component> | Function | Object,
data?: VNodeData,
children?: any,
normalizationType?: number
): VNode | Array<VNode> {
...
}

对顶层的div来说,传递给这个函数的参数为:

  • context:当前实例,即app

  • tag:”div”

  • data:{ attrs: { id: "app" } }

  • children:

    1
    2
    3
    4
    5
    6
    [
    _c("img", {
    attrs: { alt: "Vue logo", src: require("./assets/logo.png") }
    }),
    _c("div", [_vm._v("hello, world!")])
    ]

    其实就是包含2个vnode元素的数组

  • normalizationType:undefined

根据这些参数,这个函数的执行路径为:

1
2
3
4
5
6
7
8
9
10
11
12
13
14
15
16
17
18
19
20
21
22
// src/core/vdom/create-element.js
export function _createElement (
...
): VNode | Array<VNode> {
let vnode, ns
if (typeof tag === 'string') {
if (config.isReservedTag(tag)) {
// platform built-in elements
vnode = new VNode(
config.parsePlatformTagName(tag), data, children,
undefined, undefined, context
)
} else if (...) {
...
} else {
...
}
} else {
...
}
return vnode
}

直接是以内置div标签new一个vnode出来

update

得到这个vnode之后,我们调用patch:

1
vm.__patch__(vm.$el, vnode, hydrating, false /* removeOnly */)

这是vm.$el是undefined,因为这是首次渲染,我看把视角转向patch函数:

1
2
3
4
5
6
7
8
9
10
11
12
13
14
15
// src/core/vdom/patch.js
return function patch (oldVnode, vnode, hydrating, removeOnly) {
let isInitialPatch = false
const insertedVnodeQueue = []

if (isUndef(oldVnode)) {
// empty mount (likely as component), create new root element
isInitialPatch = true
createElm(vnode, insertedVnodeQueue)
} else {
...
}

return vnode.elm
}

这次很简单,因为oldVnode是空的,所以直接调用createElm基本就结束了,这次只传了2个参数,我们看看这个函数这次的执行路径:

1
2
3
4
5
6
7
8
9
10
11
12
13
14
15
16
17
18
19
20
21
22
23
24
25
26
27
28
29
30
31
32
33
34
35
// src/core/vdom/patch.js
function createElm (
vnode,
insertedVnodeQueue,
parentElm,
refElm,
nested,
ownerArray,
index
) {
vnode.isRootInsert = !nested // for transition enter check
if (createComponent(vnode, insertedVnodeQueue, parentElm, refElm)) {
return
}

const data = vnode.data
const children = vnode.children
const tag = vnode.tag
if (isDef(tag)) {
vnode.elm = nodeOps.createElement(tag, vnode)

if (__WEEX__) {
...
} else {
createChildren(vnode, children, insertedVnodeQueue)
if (isDef(data)) {
invokeCreateHooks(vnode, insertedVnodeQueue)
}
}
} else if (isTrue(vnode.isComment)) {
...
} else {
...
}
}

这次createComponent是不会返回true的,且调用之后没有任何效果,因为这里的vnode只是一个div的包装而已。代码直接进入第一个if执行下面这行代码:

1
vnode.elm = nodeOps.createElement(tag, vnode)

它直接创建一个div元素!因为children还有2个vnode,所以再调用createChildren创建子元素,这样app的整个dom就创建好了,然后patch直接返回根元素。最后回到_update把这个元素赋给vm.$el,整个数据结构变成:

在上一篇我们知道,这个根元素最终会被root插入到文档中从而展示在页面上。至此,下面这两三行简单的代码基本分析完了:

1
2
3
4
import App from './App.vue'
new Vue({
render: h => h(App),
}).$mount('#app')

可以看到,这后面其实牵涉到很多逻辑,何况我们还省略了很多细节,但是更复杂的情况也能从这里推导出来。